Ok... but how do I play??
Tutorial. Sort of....
1. Options set up.
More than a tutorial, this is more of playing a few turns and explaining some concepts....
OK, first thing we do is go to the options setings on the main menu, or in game clicking the computer button:

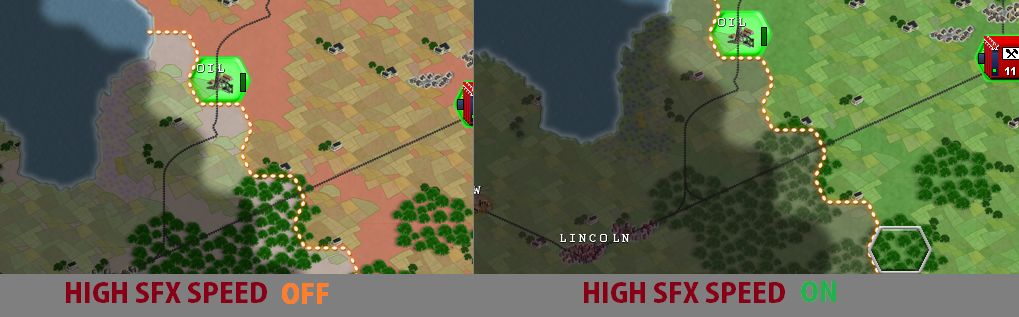
Then enable these options: HEX COLORING and HIGH GFX SPEED

The Hex Colouring makes a nation territory have a overlay with its color, useful to differentiate which player/nation is each one, because otherwise, can get very confusing, is similar to the map of any strategy game, like hoi4 for example, and High GFX Speed, makes the game use your GPU, because this is a very old game, and without that option the map scrolls very slow, unresponsive and laggy, also the colouring gets very bad because without that option there's not transparencies.
Notice the difference...
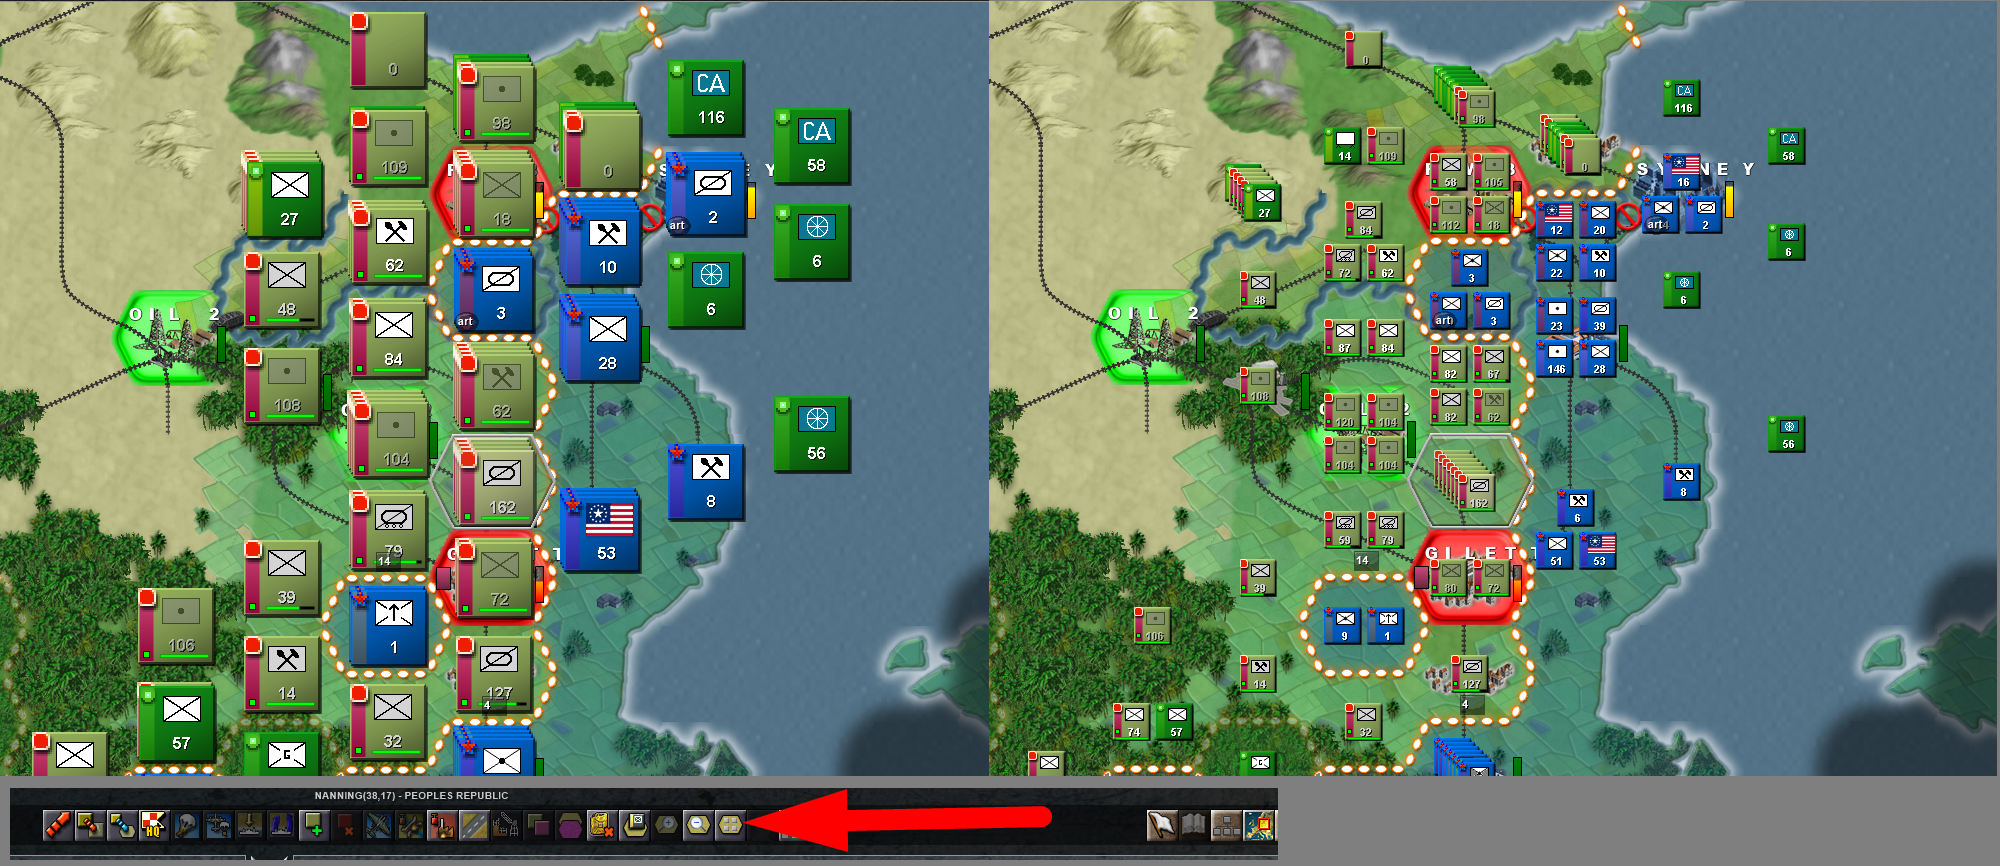
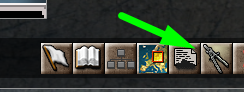
Also, in game, click this button to make the counters small, is literally unplayable without it.
2. Scenario Start
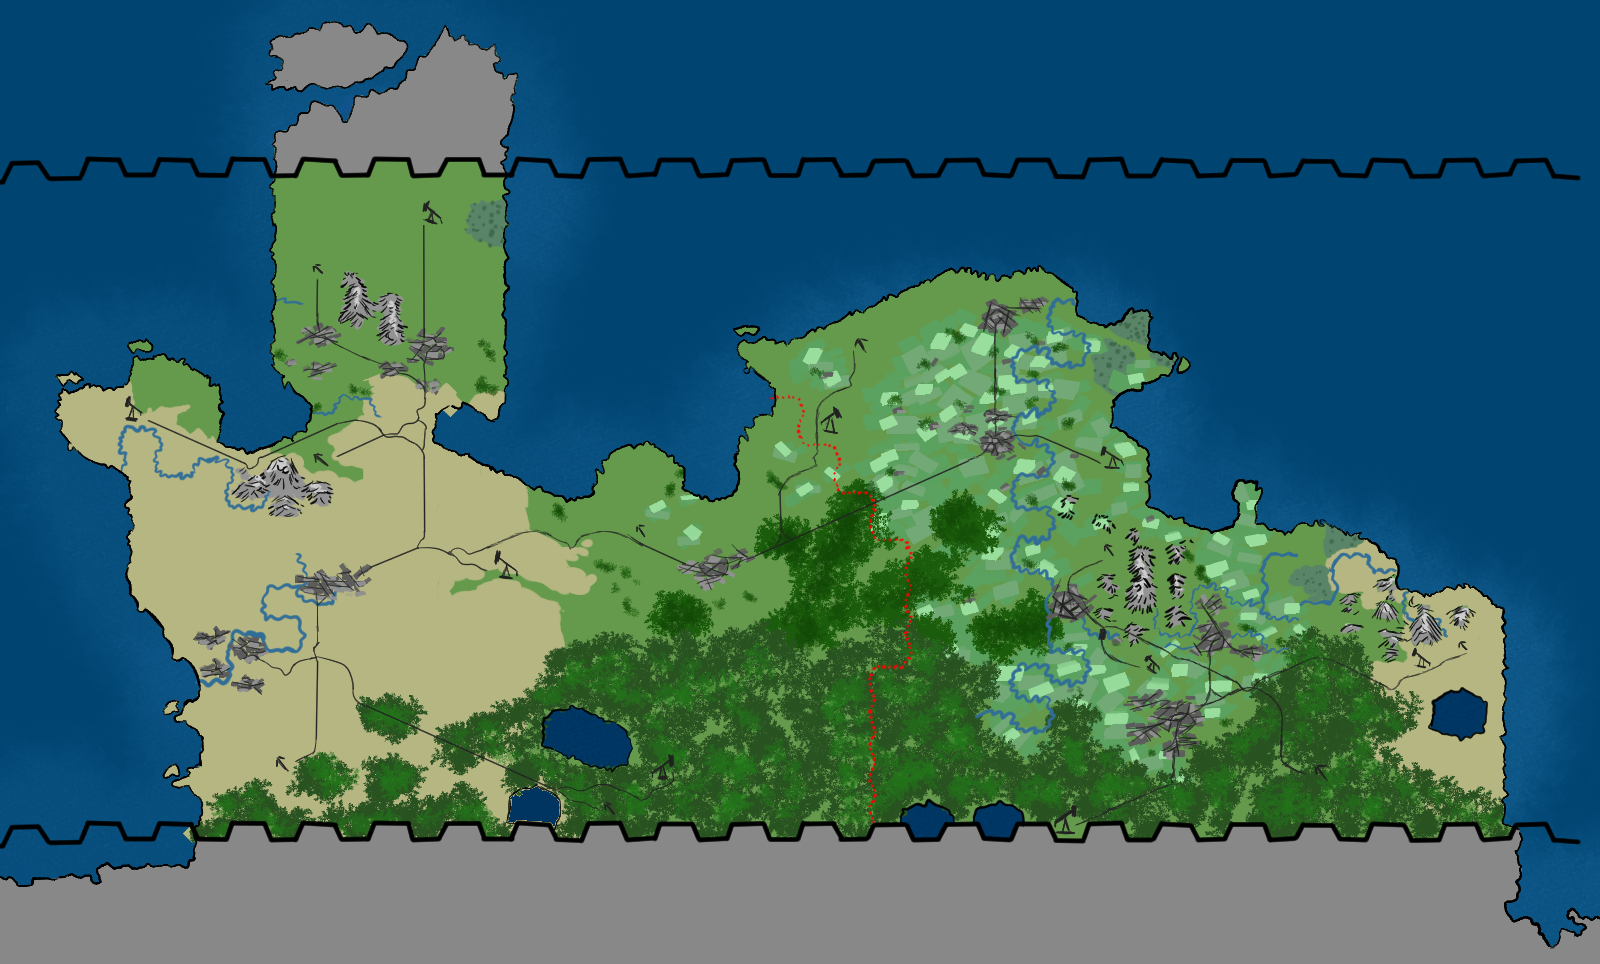
I have created a map, this one is a small map with loop. We are on a small island an only have one front against the enemy, we are playing as the chinkcoms and have to beat the british AI.
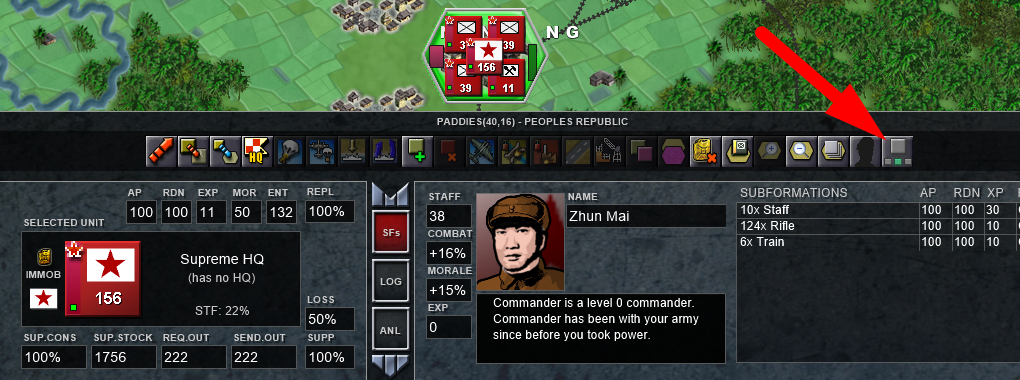
But before explaining the strategy, let's set up our initial units properly.
Click that button to select the model changer. Then, because this is an HQ, there's only the HQ options, I will change the Supreme HQ to a SHQ and the other HQ to a "Army HQ"
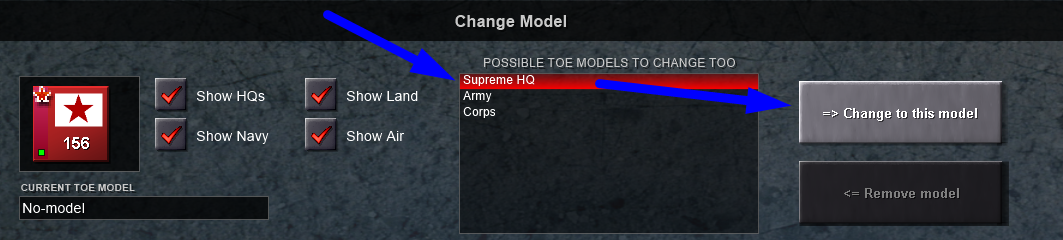
Notice that says 1SHQ, we don't want our Supreme HQ to be the "First Supreme HQ", because a SHQ is only ONE.
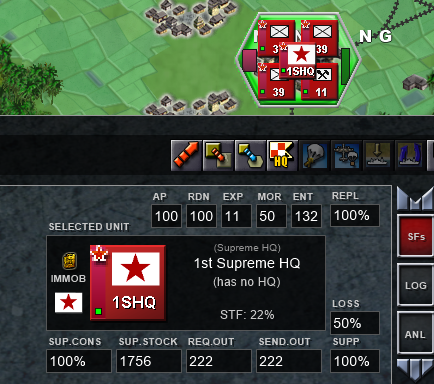
So we click the model changer button again, and change the name, that name is the short name, the letters that appear in the counter.
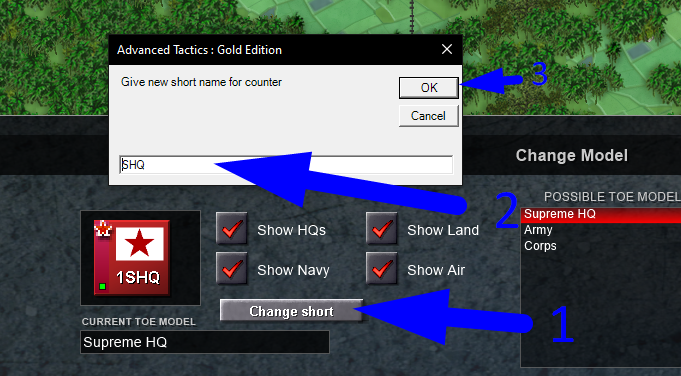
Now it's fixed. But the name of the Unit is now "SHQ Supreme HQ" so we'll change that name manually, also you can change the counter colors of an HQ by clicking on the side, my nation counters are red, so I'll use a blue for this first HQ.

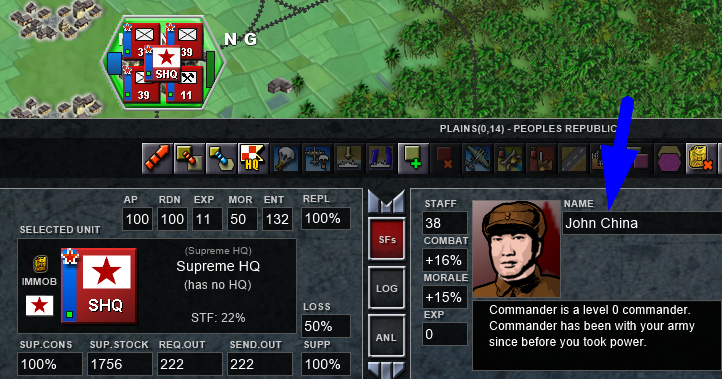
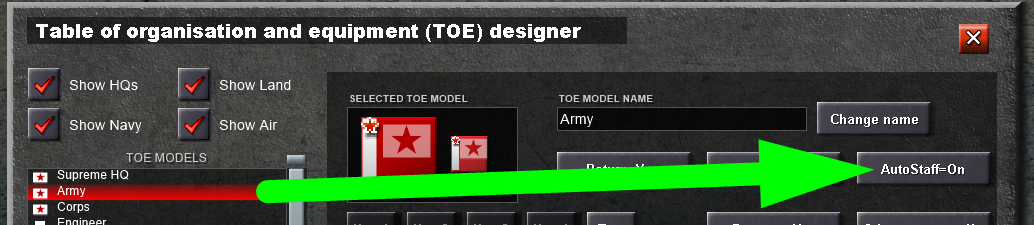
NOW IS DONE. Remember that is optional for you to do all this shit for asigning a Supreme HQ, but this serves as a tutorial on how to rename the counters, also we assing the TOE to the SHQ because the autostaff option which is helpful. Also remember that you can rename officers too, like this one who is now named John China.
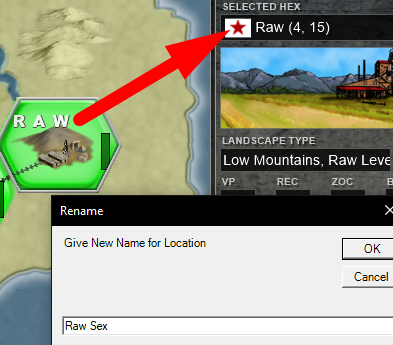
If you want to, you can also basically rename all the named locations, like cities, factories and even oil and raw locations. For that just click on the city name. After you change the name, you have to click the hexes so they can refresh with the new text.
Ok, then let's finish the thing we are supossed to do, of changing the default units to our TOE units:
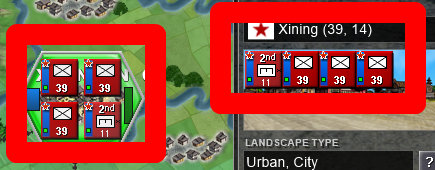
Also, when selecting units, you can click the units on the province or selecting them on that hex overview at the right of the screen, very useful for big stacks, because you can only see up to 5 counters in a hex before the stacks gets too big.
Ok, I changed all the engineers to "Engineer" and the small rifles units to "Infantry", the HQ I have on the north is also changed to "Army HQ"
2. Initial Strategy and First Turns
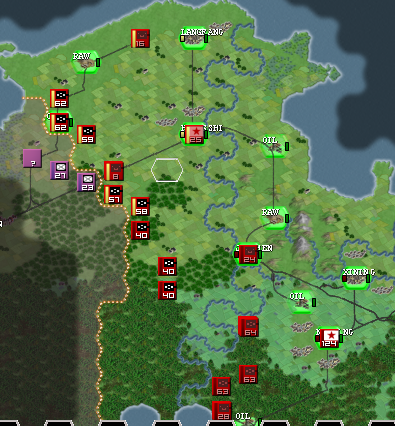
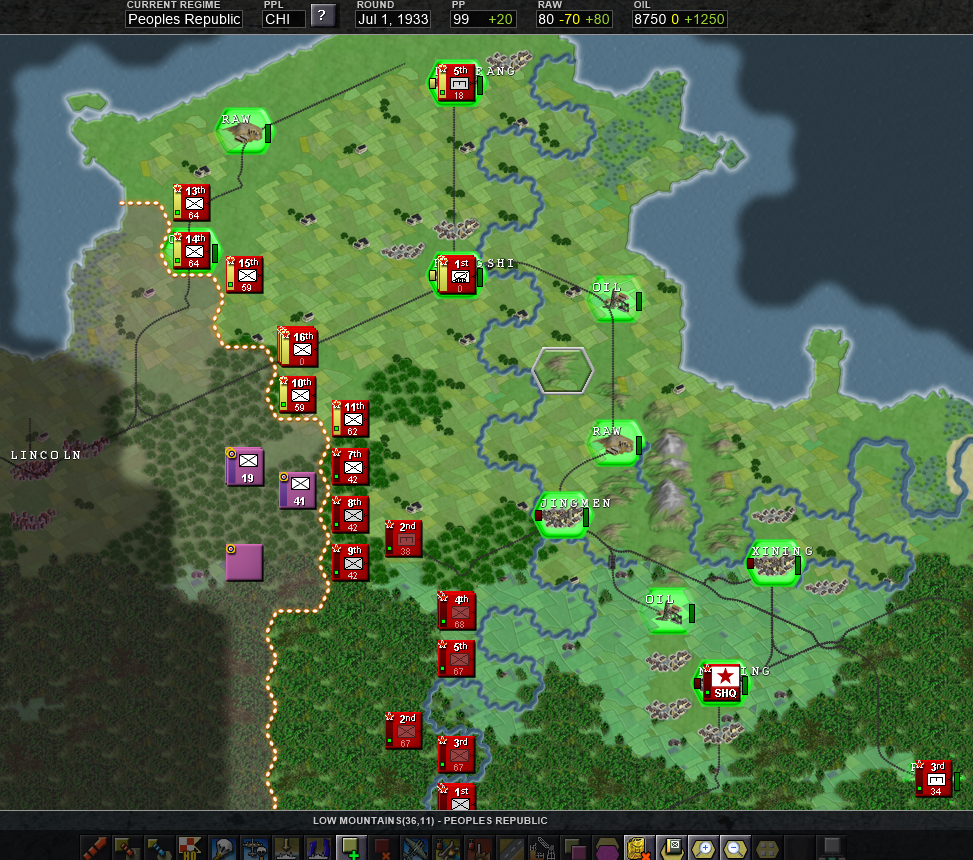
Now we can analyze our map and think on a strategy. Let's look at the map again:

At the north there is a small gap with plains that go direct to the enemy city, in the middle there is a forest, with the main enemy road, and all the south is covered up by jungle....
Is obvious that the north will be the zone of more intense warfare, so I'll set up all the north to the most elite units, under the 1st Army that will be established in the city of Huangshi, and from here, we will create a defensive line, taking priority the oil that we have just near the enemy frontier, because that's a easy target due to it's proximity, and can be subject of enemy artillery bombardment, OIL IS VITAL to our mechanized spearhead, so we have to protect that hex. In the first few turns is essential to our war effort to connect our logistics building a road between all our cities. Then, we have to build that defensive line to hold the first enemy waves, and after the enemy has been weakened... we counter attack with our mechanized forces, with the hope of destroying most part of the enemy army in a big encirclement in the north sector, if that objective is achieved, we could easily be on the offensive until the enemy frontline stabilizes later on, or until our supply lines start getting bad.
As for the south jungle, that will be a minor, mainly infrantry army under direct command of the SHQ, and maybe later on they will be the 2nd corps, but as first, I'll try to prioritize all the spending to the 1st Army.
Even if our initial defense falls, we can withdraw behind the river and there organize a solid defense, in the south, behind the river is all rice paddies, a hex where armored units can't enter without road, so we have a huge defensive factor to our side. Again, all the heavy combat will probably be done on the north, where is to expect a enemy spearhead in the first turns.
Einsenhower said:
Plans are useless, but planning is essential.
-Einsenhower
Let's see if our first plan will hold, probably not, after all, war is chaos. I HEREBY ANNOUNCE: OPERATION RICE COOKER

These are all the movements done in the turn 1, because is very imporant to have your cities connected, because that simplifies the logistic and the delivery of supply and production, I placed two engineers to build the roads in that small gap, they should gather the EP (engineer points) in a few turns and build it quickly as possible.
But before ending the turn we have to set up our production. And before that a quick mention to the transfer feature and the graph feature.
TRANSFER:
Basically you manually move the contents of a unit to other unit.Usually TOE transfers are done between turns, so this is important if you can't wait until that (to reinforce a unit for a defense or something). Also manual transfers cost more transfer points that automatic TOE transfers. If the transfer are made in the same hex, they don't waste movement, so you can move the new transfered unit, otherwise, it will not have movement points, because I think this works like strategic transfer and wastes a lot of movement points. Also your capacity for transfer (both TOE automatic transfers and manual transfers), are dependend on your RAILCAP, so build more trains if needed, also TRUCKS or CARGOSHIPS for no roads or sea transfers.
To use the transfer click the transfer button on the unit you want to transfer from:
![]()
For quick transfer you can use the TOE requirements button, that will transfer all the production that the particular unit needs has on its TOE design. But you can also do it the manual way for your needs.
![]()
In this image I explain a bit water transfers:
![]()
Now I'll quickly explain the graph:
GRAPH
This one is so easy I won't bother with pictures; the first button, the stonks one, "statistics" or press f3. In that screen you'll see several stats of other players and yours. You can alternate between "default", "normalized" and "very normalized" to have a better comphrension of the graphs. Simple.
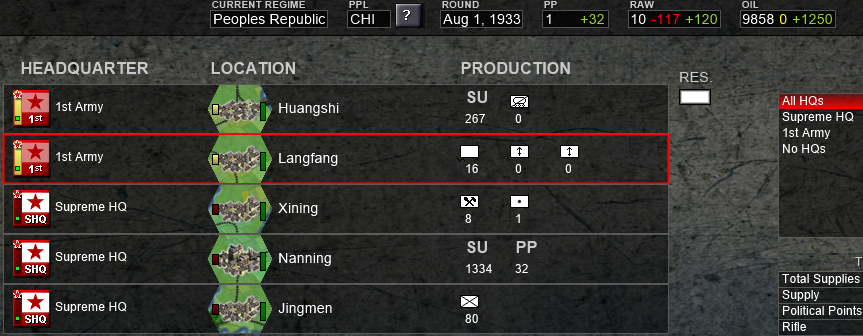
3. Production
I don't want to explain what each button does, because it's on the manual, but for production is this:
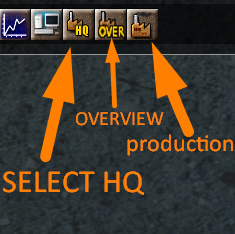
The "set HQ" means where the city is going to send it's production to. Also WITHOUT HQ it doesn't produces, and will appear with a gray color, REMEMBER that when you occupy a city it doesn't produces UNTIL you assign a HQ to it, so remember to ASSIGN HQ to cities. What I like to do is to set all my cities to produce to my SHQ, my SHQ is the HQ with most trains, so it has a shitton of logistics, you can also divide the production by zones, for example, in this map, to set up the north cities to the north HQ (1st Army) and the south ones to the south HQ (Supreme HQ). Do as you want IDK. Maybe having production storage in separate places is a good way to avoid mass bombardement of your production, because is harder for the enemy bomb multiple hexes than only one.
Second thing, that bar that appears next to your cities is the structural damage bar, if is full it produces at max capacity, it get's lowered by attacks (artillery, strategic bombers etc..) you will produce even less, I think at 0 you don't produce. Each turn the cities regain a certain amount. For captured cities, they have a cooldown until they can produce. Resources are like cities btw.
BTW, your capital has more production points that other cities, so take this in consideration. Also CHECK your RAW number, in this first turn I am building a few expensive trains so I am having deficit, but next one I'll delete train production and start saving for upgrading my RAW resources.
Basically what I am producing is engineers and rifles for replenishing the current units deployed, horses for mobility of said units, trains for more logistics to deliver all these production, PP (political points) to save a bit for building shit and buying research in the next turns.
This is my production for turn 1:

We can finish our turn by now.
TURN 2
In singleplayer, by default you can see the AI movements, but in multiplayer, due to it's IGOUGO PBEM nature, you can't see the movements of you enemies when you start your turn. TO SEE THE MOVEMENTS OF THE OTHER PLAYERS PRESS THE HISTORY BUTTON.

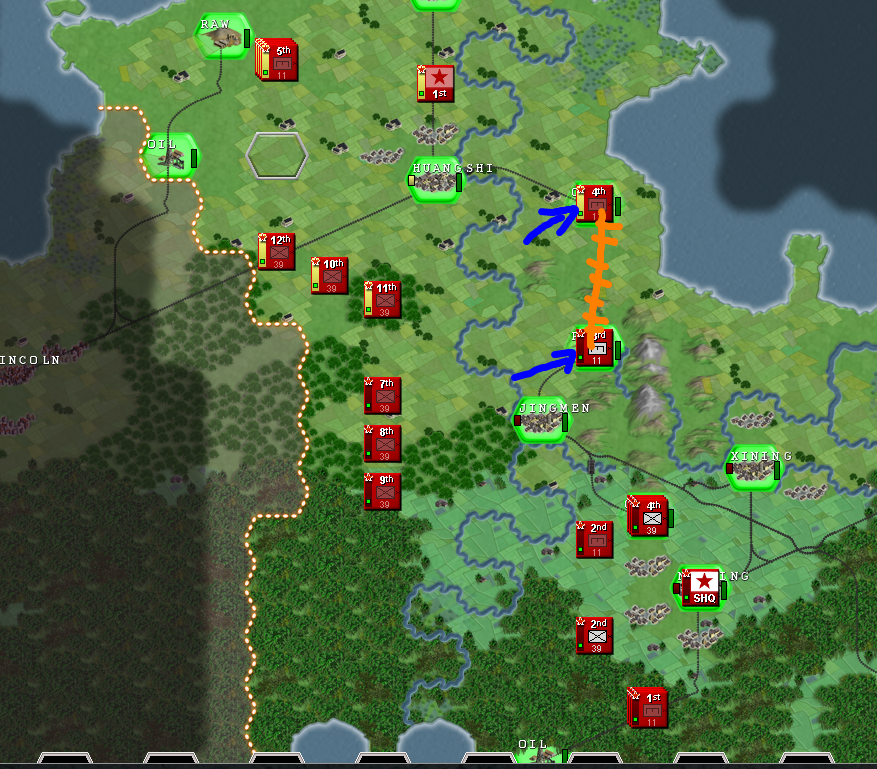
In this case, we can see that the enemy moved that 50 power infantry near the frontier. (notice that the number of the counter MEANS THE POWER)

Ok, I finished building the road with the two engineers in this part, so now all my logistics is unified, I sent the yellow engineer to the frontlines and I am going to send this one to a RAW resource in the rear so it can build points until i can upgrade, I am going to use the strategic transfer. But notice a thing, the cost depends on which HQ you're using for the transfer. For example in this case:
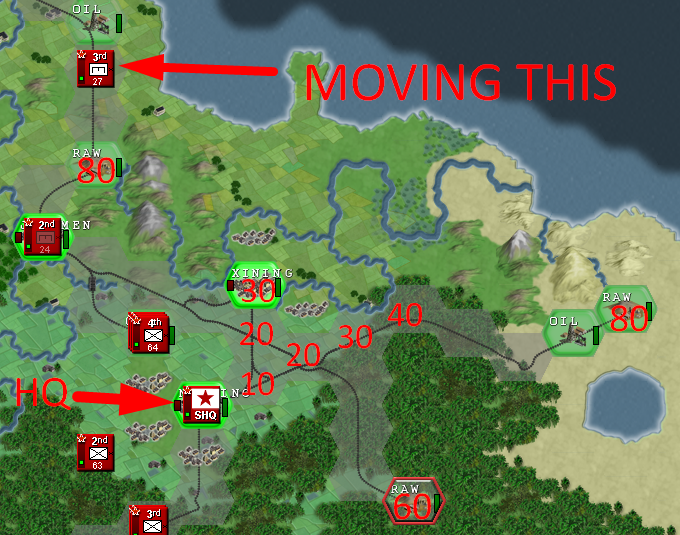
With my engineers I am building a road in the bottom south so they have supplies in the deep jungle, other one in the middle, and trying to connect the road of my north frontier with my north city.
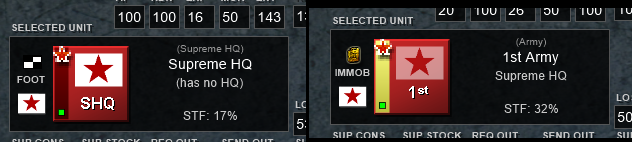
Also I changed the trains that were consuming 120 RAW for staff. Why staff? Notice how my HQs have low STF percentage? That's the strenght of the HQs, they need to be at 100% to give their bonuses correctly. Also bonuses only work up to 8 hexes of distance if i understood it correctly.
WE FINISH TURN 2 LIKE THIS:
TURN 3
I had extremely low STF in my 1st Army HQ, because all the staff went to the SHQ storage.... It was because I had the autostaff OFF, so NEVER FORGET TO ENABLING THE AUTOSTAFF ON YOUR HQs!!! (if you have a HQ just for storage ex: a port, then maybe you don't even need staff)
Ok, I have 120 PP so I am going to lower my PP production because I want to produce ARMORED CARS. But for producing those, you need to RESEARCH them first. TO RESEARCH you open this menu:
And on this list you can buy research with PP. Notice that in MULTIPLAYER GAMES, you will se a parenthesis next to a item for example, ARMORED CARS (1) means that one of your allies HAS that technology. This is because in multiplayer you can share for free technology with your allies, so maybe you don't want to spent PP on something you ally can give you to you next turn.
OK, so I buy Armored Cars.
Now I am producing 7 armored cars in Huangshi, one of my Armored Recon Units needs 5, so that means I can produce 1 unit per turn and have a bit of margin for replenishing losses. For building a unit, just click on ANY hex (take in consideration, that road hexes are better, because the trains go directly throught them) and click this button:

Notice, that depending on what you make, has a cost in PP.

We are making a formation, then the game ask for which TOE and which HQ. Try to not missclick.
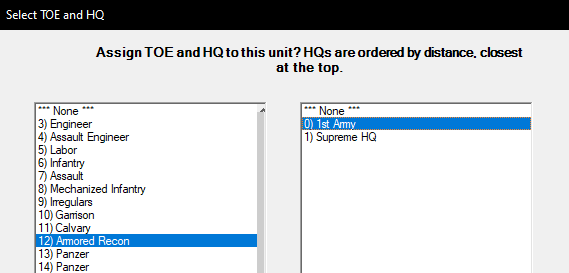
The unit will reinforce by next turn.
BTW, on a unit, you can click on these squares, if you hover over them it literally says what they do, but basically they are the Replenishment, the Losses and the Supply
This is good if you want to make some units have more priority, or lower the priority of some other units, like garrisons... or a epic 100% loses to make units retreat faster for withdrawal operations... or to make them FIGHT TO DEATH FOR GOD AND THE EMPEROR for those suicidal last stands... It's up to you.
WE END TURN 3 LIKE THIS:
TURN 4
We got this message at the beiggining.
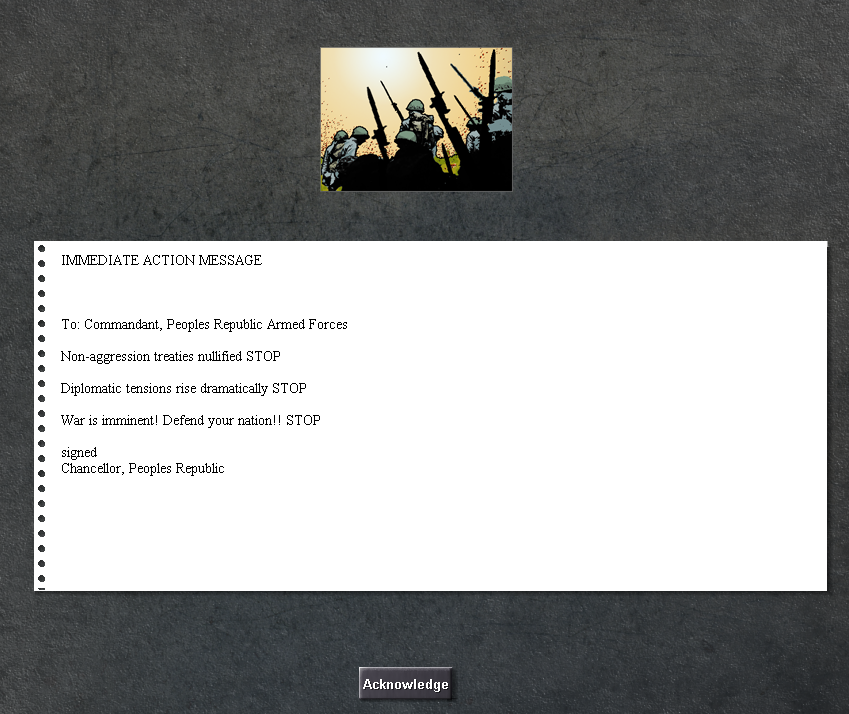
This means that now we can declare wars. This appears before this game had the temporal peace option, useful because the AI tends to rush you at turn 2 otherwise. Now we have to be careful because in any moment the AI will invade us.
Not too much going on this turn. I basically managed to cover all the front my my units already, build another Armored Recon for next turn and spent all my PP to get artillery, machine gun and mortar. Now I am producing those in low quantities. I am also creating my first artillery unit for the incoming north offensive.
TURN 5
As you can see, the enemy has not yet covered their front. So I think I should start the war right now before they get stronger.... We do all that kind of things on the diplomatic menu.

WAR HAS STARTED
The Glorious People's Army will fight against the Empire's tyranny
I want to bomb this hex with that artillery unit, so now I'll explain a bit artillery. You select the artillery option:
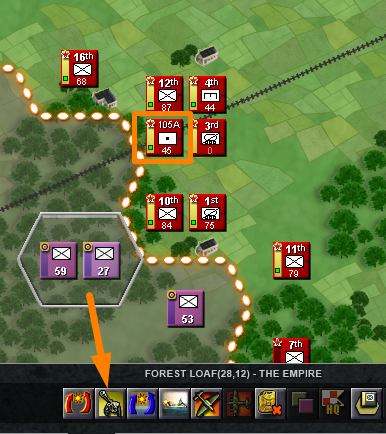
The overstack limit means that if you surpass it, the attack will get debuffs.... but for artillery it doesn't matter that much... becasue even if you get debuff, just shooting random barrages from the safe rear is not as bad as sending a gorillion infantry to die.

Art is very good for lowering the "readiness" NEVER do your offensives without artillery. Read the manual for more info.
"Artillery is the queen of the battlefield"
-French proverb
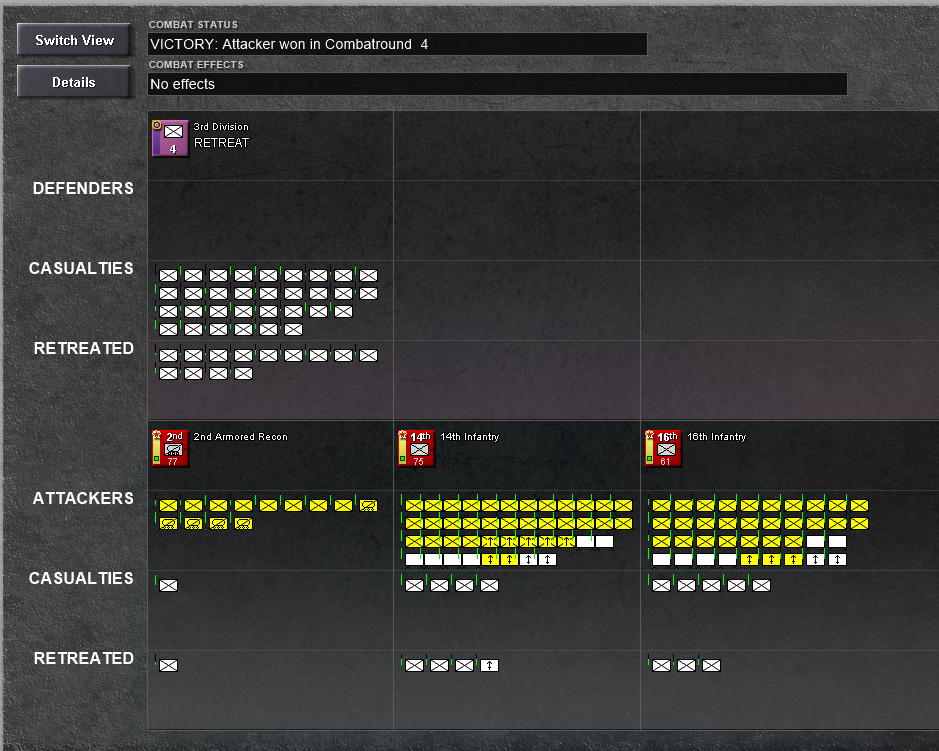
And after the barrage, I'll attack.
For attacking is the same as the artillery, but with the attack button. The STACK number matters more now, because you can get debuffs if you surpass it. The more hexes you attack from, the more points you will have for attacking. Since I am attacking from 2 hexes, I get this +5% bonus only. I think you need at least 3 hexes for 150 max stack points.
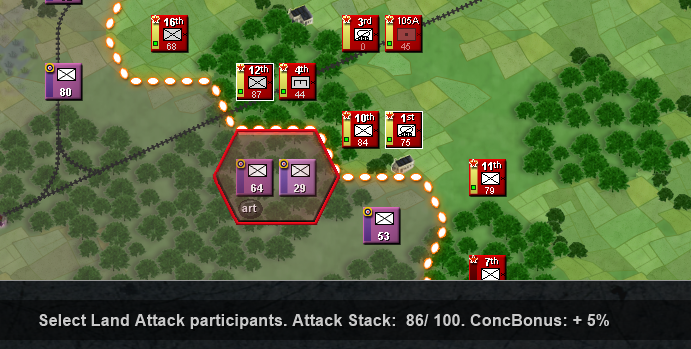
Oh....
It was a bit of a failure, so from now on I'll try to be more careful.

With this I end the turn.
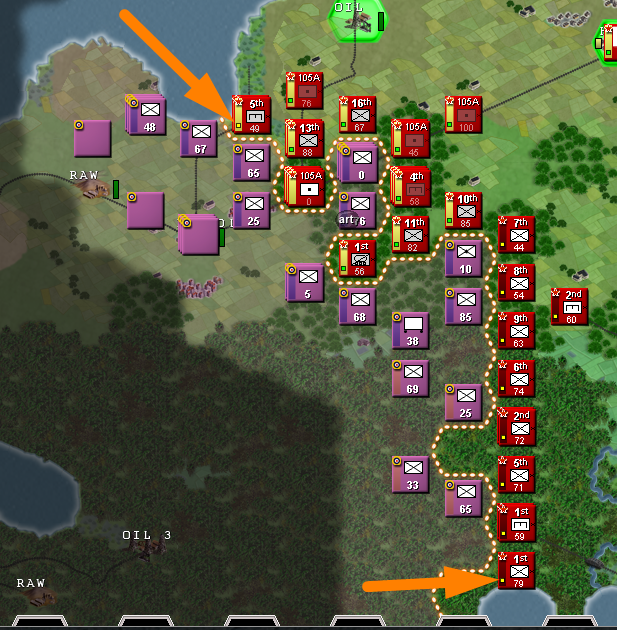
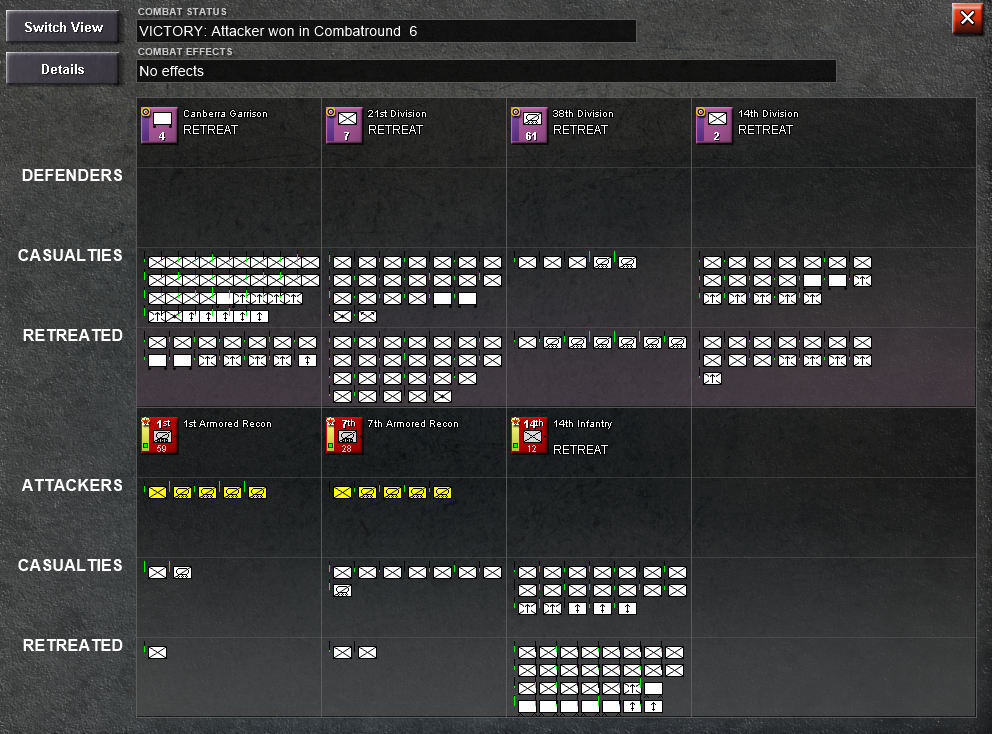
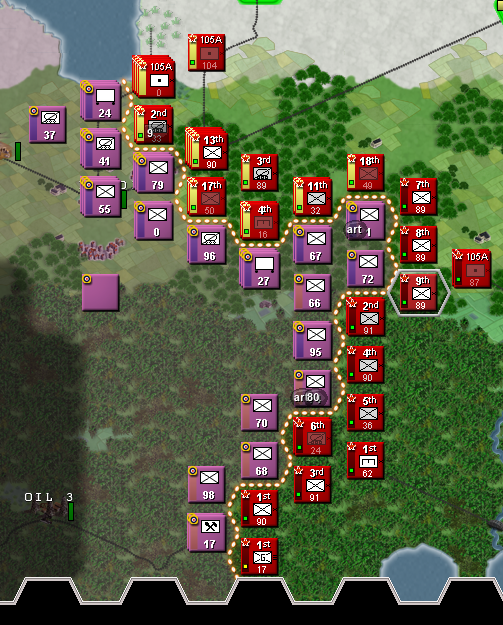
TURN 6
We start our offensive:

And ends like this, starting with the flanking maniouver, trying to pocket the enemy's army.

Also now our attacks are effective, and they are from from multiple sides!
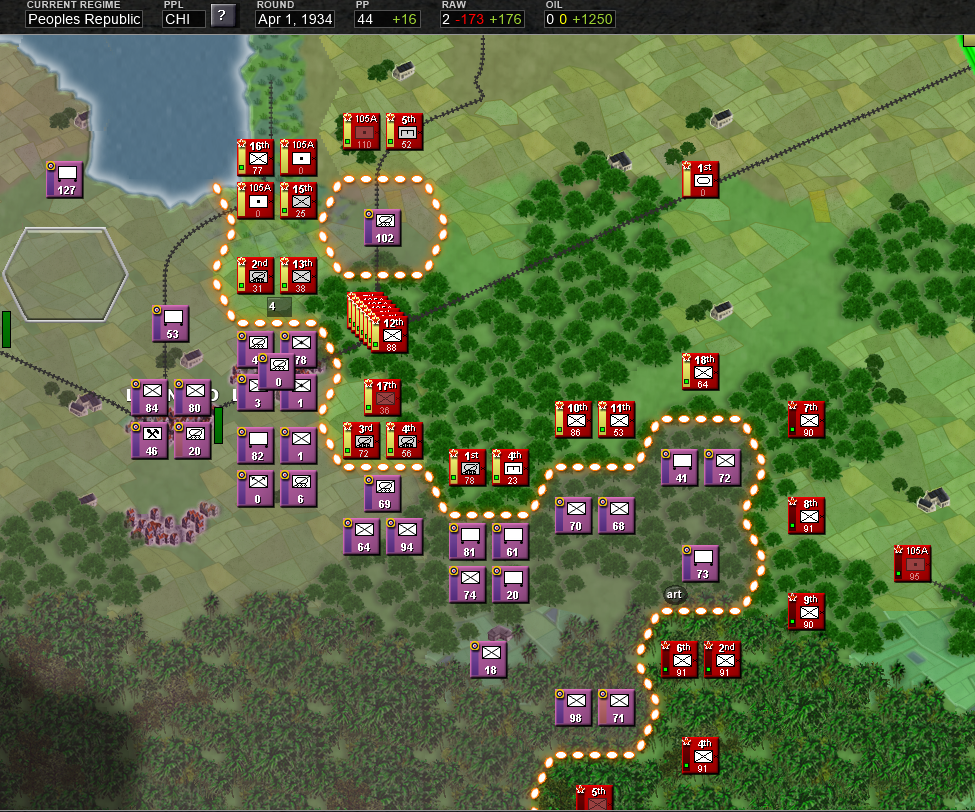
TURN 7
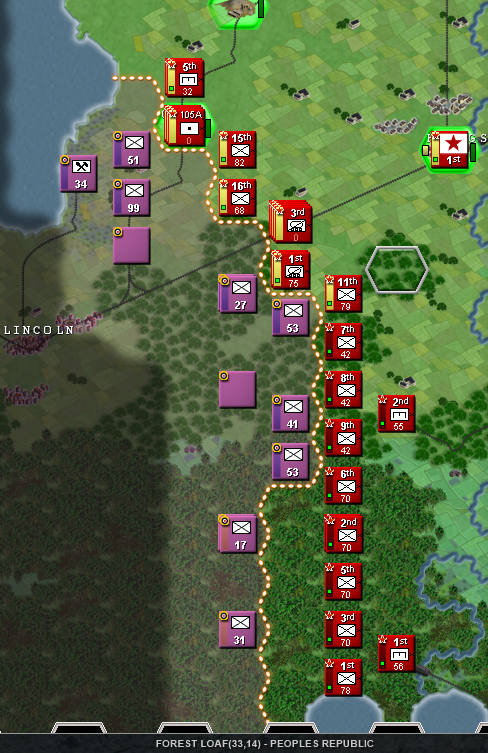
Our offensive is doing good, in the north, we almost managed to pocket some units.
But notice how some units have a yellow square?? That's that they are not receiving supplies. So we'll have to build more supplies. Is not the roads, because my road network is good enough, you can check with the supply button.
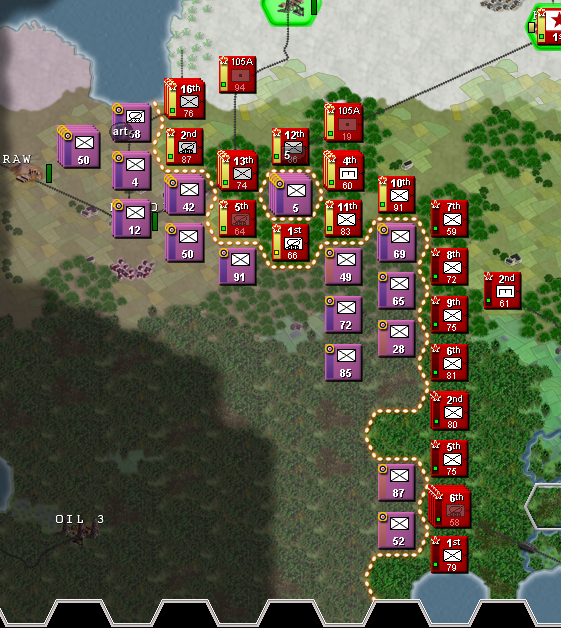
TURN 8
I completed the pocket, the enemy has already brought his armored brigades in the north, but in that exact hex i am defending on a mud swamp, so armored units have difficulties crossing mud, because is December, and the winter is hard for offensives... But the enemy has good climate all the year!! So for me is not a factor in consideration. Also in the jungles of the south I am starting to build a small offensive army to start attacking soon and crumble the whole enemy frontline.
TURN 9
The enemy tried to break the encirclement, failed. I made an attack also failed. So the forces sourrounding the encirclement are in danger to be overrun and the encircled unit may be able to escape.... I also advanced on the south a bit. FUCK THAT TILE OF THE ENCIRCLEMENT HAS MUD SO THIS SUCKS BECAUSE I CAN'T USE PROPERLY MY ARMORED BRIGADES.

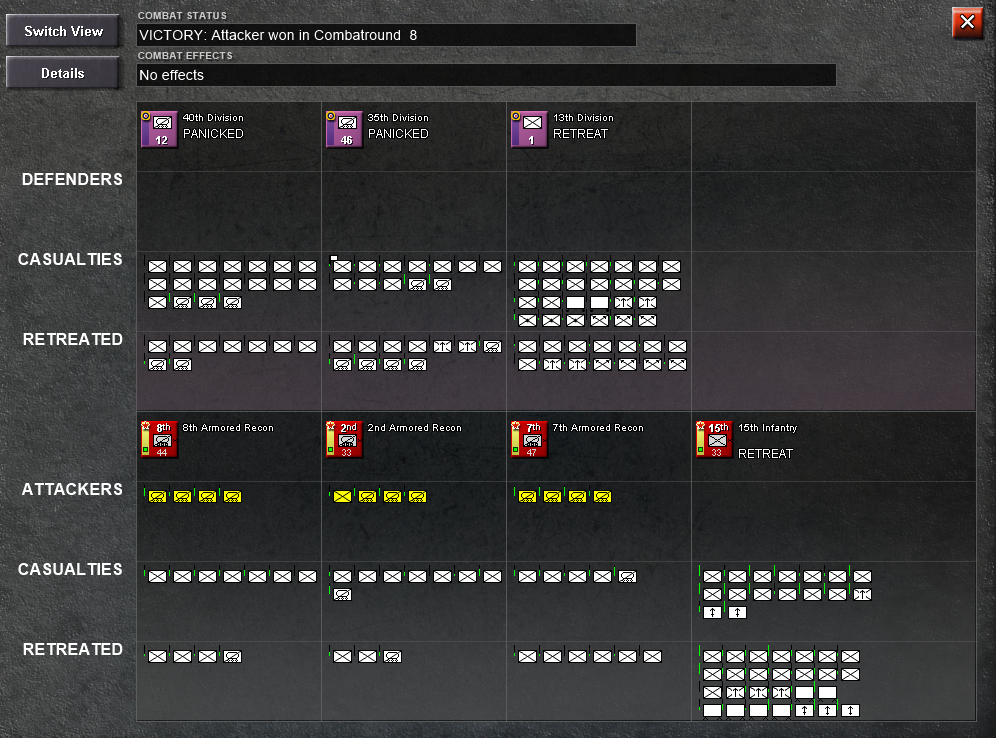
TURN 10
Indeed, the enemy managed to break the front, but this actually helped. Because in this turn, they had to move some of their units to the new hex, making their defense weaker, and I built 2 new armored recon units I used to make a attack and closed the pocket again. It was a basically suicide attack, I had to set up the units to 100% losses. And I almost lose, the 14th infantry brigade was basically aniquilated, but was a worth sacrifice.
Then, because winter has ended, and there's no mud; I attacked with all my troops and ELIMINATED all the troops in the pocket. Now I am preparing for a massive offensive.

TURN 11
We lost some hexes this turn... But don't worry, that won't hinder our offensive, our priority is to take the city, grab those precious RAW resources and encircle the entire enemy army.
The biggest attack this turn was this one.
So, we end our turn like this. Also I started to produce some tanks by removing some of my horse production. In a few turns I'll have a powerfull Light Tank unit. But our oil reserves are getting lower and lower each turn, as our RAW limit, we gain +160, and we spend 158... We have to improve our RAW and OIL resources in our territory with very urgency.
TURN 12
At this point... Even if we are doing good holding the front, we are reached our limit and our oil reserves are 0. And or raw is also 0. This is going to make things slower.... Also that enemy unit on our rear makes shit very complex because we lack enough units to cover everything. Maybe we need to increase our infantry.... Betting everything on our panzer division to manage to push until the enemy city so we can increase our oil reserves.....
TURN 13
In this turn the panzer division managed to push the enemy back to their smelly british holes, but I runned out of fuel for this turn and I can't keep pushing.... next turn I will get enough EP to upgrade one of my oils to level 2, and spent the valuable amount of 40PP.... That weird enemy push with infantry sucks... But overall I think i am doing it good...

TURN 14
Actually i forgot to report turn 14, this is 15 lmao. Basically the enemy started his offensive. Usually I should retreat and create a stronger line somewhere else... But I don't want to do that. Less use this opportunity that god himself has created to capture the fucking city now that his units are dispersed. Also my second panzer division has been created. Now is so over for the enemy expansion.
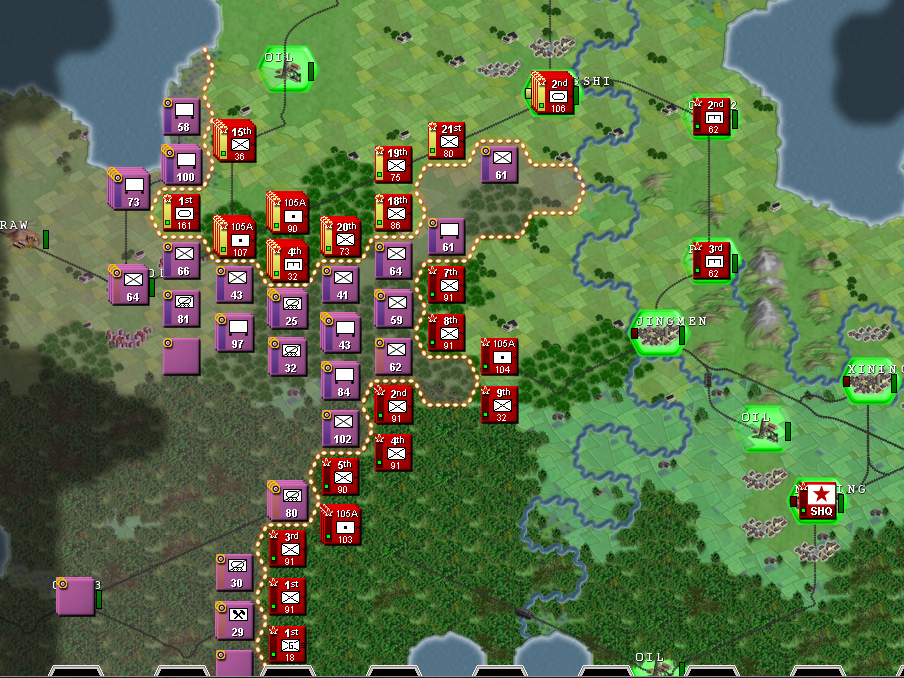
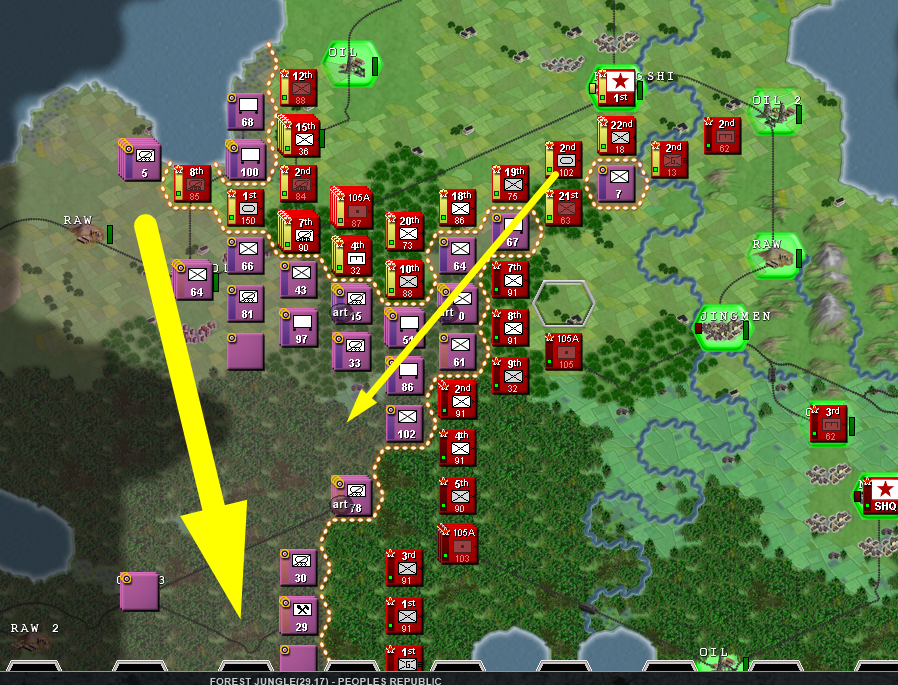
TURN 16??
I lost the turn count.... Anyways, the 2nd Panzer is very strong, and the 1st Panzer managed to encircle some strong units.... My main problem right now is the OIL... The AI cheats heavily and has infinite OIL and resources... So they can do all the armored offensives they want... I did a small retreat with the infantry in the south... just to be safe. Also this is good if in the future I manage to take the DAMN CITY so I will be able to push down with the entire 1st Army and basically encircle and DESTROY all the enemy army (basically my wet dream).
BTW, this "tutorial" was supposed to last until we capture the first city... But I got tired of writing it, so I'll stop now.